Friday, January 30, 2009

Sharing the Joy

Yesterday I taught three thirty-something (or perhaps twenty-something) techno-geeks (*) to knit, upon the advice of a colleague, a less nerdy but equally geeky (he's smart, but used to play football. What does that mean?) thirty-something (or perhaps twenty-something. I'm not good at this age thing).

[(*) Lest anyone be confused, I use the word "geeks" with the utmost respect and warmth, since I have come to realise that they are of my tribe, or more precisely, I am of theirs. I embrace my geekiness happily: I am a Bead Geek, a Knitting Geek, and a Spinning Geek in my spare time, and a software geek to support this.]

It was interesting.

I've taught beading to rank beginners often, and years ago when my daughter was in third grade, I taught a bunch of kids to knit. Looking back, what a hoot.

I bought dowels which I cut and sharpened with my trusty electric pencil sharpener, and the kids sanded and waxed them and glued Fimo beads (made by me) to the ends.

The next week we dyed wool yarn with Kool Aid in the microwave.

The week after that we cast on 24 stitches and learned to knit. They caught on pretty quickly, and seemed to vaguely like it. I told them to take their knitting home and knit knit knit to make it grow.

The next week a couple of kids had worked a couple of rows, and a few more had done nothing. One little girl's knitting had not grown in length, but had ballooned to a frightening one hundred and thirty-five stitches, give or take. I don't know how she did it, and I could not undo it, so we cut off the tangle and started again.

I had thought that six (or was it eight?) weeks would be enough time to knit a strip twice as long as it was wide, sew it together and stuff with lentils for a hackey-sack thing, but apparently this was in reach for only the best and brightest. Or perhaps the most diligent suck-ups. Sometimes I think it's the same thing with kids.

Yesterday was not like that. We cast on for about forty minutes, at which point I looked at my watch and realised that actual knitting, not to mention casting off, were still unexplained and I needed to be doing actual work in fifteen minutes. 

"You mean it gets better?" Oliver asked incredulously.

I think so.

He's keen to make a washcloth, and today, after a very loose start yesterday, showed me his experiment in Very Tight Tension. We agreed it was less than workable.

All-in-all, I'm happy. I've spread The Word (and The Word is Knitting. I believe there are other Words too, but Knitting was yesterday's Word) a little. I'm doing my bit for The Year of the Natural Fiber, aren't I?

And with that smug virtue firmly embedded in today's psyche,  I bring you more Shameless Commerce in the way of beaded bead caps for rather large beads (I used 20mm blue tiger eye beads).
They're like candy or potato chips (or OMG Flamin' Hot Cheetos, now my dirty secret is out - who'm I kidding? It's not a secret!) because it's hard to stop at just one.
Which is just as well, because they work well in multiples to accent gemstone or lampwork beads (Note to self: Check the lampwork stash).
Each cap also uses a miniscule amount of each type of bead, so those leftover beads which are too few for any reasonable project are just the ticket here.
Beaded Bead Caps: $6 for PDF emailed to you


Materials:
  Size 11 seed beads
  Size 8 seed beads
  Size 15 seed beads
  Size 11 triangle seed beads
  Japanese fringe beads
  4mm fire-polished beads
  2x3mm faceted rondelle beads
  Your favourite beading thread
  Size 10 (or appropriate) needle

Wednesday, January 28, 2009

Rewards for Good Behaviour

I think self-indulgence is totally warranted as a reward for self discipline and attention to duty.

I've been diligent and hardworking, making a sample as I write instructions for one of my Bead Fest classes. Lots of leaves. More than the eye can see - this is only the beginning.
I was forced to take a break/check whether the new seed beads arrived at the bead store/see whether 50% off gemstones could tempt me.
Yup.

Blue tiger eye, a half strand of huge beads with crazy wild chatoyance.  To get back in the dutiful beading groove (instructions, sample), I made a couple of beaded beads - I just happened to have matching beads. Surprise. I usually have matching beads.

And then I dreamed of big fat beaded bead caps, and tried a few until I'd got it.
I know what I want to do, which of course wars with what I should do. Beading-wise. Life-wise, I should get to sleep earlier instead of obsessing about blue fire and gold fire.

Saturday, January 24, 2009

Uncelebrated

Birthdays come and go and come again no matter what. 

It's something of an odd realization that even after his death, today is still my father's birthday.

This is my favourite picture of me and my dad.

Thursday, January 22, 2009

Baby Steps

Slow-going.
Astonishingly close to True Colour. I have no idea how this happens. Or doesn't, more often - a photographer I am not, unlike my daughter who brought in, according to the guy running the gallery, "huge crowds, at least twenty people or so" which I'm inferring is a lot for a Sunday.

So as you can see, I have this marquise shape thing going, which I'm rather enjoying: little cupped peyote leaves and right angle weave open shapes, each with its own accent bead. If I carry on enjoying it this much and don't get anxious for The Next Thing, it'll go all the way around the neck in the same manner, but more likely, the back will be simpler and smoother. 

Something I'm liking as a side-effect to joining curves to curves is that it isn't too stiff, and I'm hoping it will lie naturally around the curve of the neck.

I've been knitting, but not photographing my knitting until this evening.

Above are the sleeves, complete with saddle shoulders (out of the picture to the left) and cabled cuffs, knitted around first (out of the picture to the left). 

The yarn has the slightest ever fuzziness due to its mohair (kid as in baby, not joke) content. The grey undertone variations are from the mohair and some blue silk, and the variations in russet intensity were an intentional dyeing effect.

The plan is for an A-line cardigan/jacket with asymmetrical collar if I have enough yarn, so right now I'm knitting the cabled bottom edge of the body, which seems never-ending, and is horribly reminiscent of a knitting scarf, though I hope shorter, but I'm loathe to calculate as the final measurement is likely to make me unhappy.

The cuffs flare ever so slightly, which is fine for sleeves, but will be unattractive in a hem; this is useful information as it will help me to adjust my stitch pickup rate. What I really ought to do is to be very careful and precise, altering my pickup rate depending on whether the stitches will become stocking stitch or a cabled section, which will draw in more, thus necessitating a faster pickup rate.

For the cuffs I picked up (or knitted up, if you like) three stitches for every four cuff rows, which as I said, resulted in a slight bell for the cuff.

This is not what I want for the bottom of my jacket, so I'll pick up four for every five cuff rows, and six across sections that will be cabled. Cables draw in, somewhere between five and ten percent in general, unless they're extreme cables, with huge crosses (like ten by ten), so if you're working cables off a bottom band, you'll want to increase five to ten percent across the cable sections so that you don't get unevenness and puckers on the bottom welt.

Amazingly, I've seen published patterns otherwise pretty but spoiled by this lack of attention to detail.

Saturday, January 17, 2009

Actual Stuff, Not Just Fluff

I know, twice in one day. Shocking.
But I've been busy with my hands, not just stewing. I have another thingie like the one above, but with a darker centre. I think they'll be pendants on necklaces, but I just wanted to make them because they come together so nicely and quickly. The large round beads were sold as red aventurine, or perhaps peach, but they're barely tinged with warmth. Still a pretty colour, but less of it than I'd hoped for.

I know I showed you this stone last weekend.
The bezel isn't quite finished, as I can't convince myself that it's actually perfectly secure in the front.
The back won't let anything escape though, I'm pretty sure.

I used a tube of four-sided right-angle-weave to form the initial bezel frame, and then added two rows of right-angle-weave for the back, and so far just one for the front. I might have to get creative with a scalloped edging, or perhaps a couple of carefully-carelessly placed pearls and crystals across the front to hold it closed. You can already see a couple of the lovely little copper-lined droplets holding the pale end closed.
The necklace part of it will consist of leafy shapes like these two above joined together semi-randomly, and possibly a few open marquise shapes echoing the bezel. It's a little slow-going though, especially because much of my effort seems to be prototyping, or figuring out what to do by doing the opposite, much along the lines of two steps forward, one step back, which is better than negative progress, though not what I was aiming for: Beadwork At The Speed Of LIght. And then there's, y'know, the work week that's the real time-suck.

I should take pictures of my knitting, as there's Real Progress.

I have two sleeves, each with a different cable (of course) that extends to form the saddle shoulder, as well as about half of the bottom band/hem of the jacket. 

At some point I'll have to stop cabling willy-nilly and actually figure out how many stitches I want for each panel (three for each front, six for the back, all the same width) and how that corresponds to the pick-up rate along the bottom band, which will of course determine how long to make it. I'm not quite at that point yet, but if history is any indicator, suddenly I will be completely unprepared, and have the knitting grind to a halt as I madly measure and calculate, or procrastinate and work on socks instead, but I'd really rather keep the momentum so that it's finished in time for me to complete another sweater that will be finished while the weather is still cold enough to wear it this season.

Preferably.

I Don't Want What's In Your Head

A rant has been brewing since mid-December, and I think it's crystallising.

It all started with this exchange, quoted verbatim but redacted slightly:

Person #1: "one of the kids in the neighbor hood was telling another friend.that they dont say "Merry Christmas", because of so many Religions beliefs and their holidays. In school its "Happy Holidays" is this true. I dont know."

Person #2: " it will always be " MERRY CHRISTMAS" TO ME. Say what is in your heart, We can't give into the minority that is trying to take God away from us."

I have rarely come across such a hateful, narrow-minded, ethnocentric, ignorant expression of the repudiation of one of my core beliefs. I bit my tongue (or more literally, sat on my fingers), because this was in a forum completely unrelated to this topic, and I had no interest in even engaging with wilful blindness.

I'm not a religious person, though like many I had an upbringing filled with religious ritual (though little explicit spirituality) which pretty much revolved around food and family. I like the food and family part, but quite frankly the spiritual trappings of faith, and the notion of faith itself leave me at best unmoved, and generally make me want to run away, screaming. 

Me. For myself. 

I don't want it and can't subscribe to it.

However I absolutely support the right of anyone anywhere to believe in anything and practise the same as long as it does not involve their prescribing or proscribing my behaviour, except insofar as my behaviour infringes on their behaviour which may infringe on mine - but let me skip to the conclusion which is that I believe we should all treat each other's belief systems (not to mention cultural backgrounds and so on and so forth to quote - completely out of context - someone more amusing than I) with respect, and allow everyone to act upon their belief systems unless it hurts someone else.

Except for a couple of years in graduate school, I've always lived in countries in which the majority cultural belief system was not mine, and quite frankly, it very quickly gets very old having the majority continually make wrong assumptions about one just because they are too lazy and too narrow to consider the fact that majority homogeneity does not translate to individual homogeneity, and that a small adjustment in interactions with others, without altering one's internal status, can really go a long way in maintaining harmonious relations among disparate groups.

In other words, wishing strangers or at least non-intimates about whom one may not know the particulars of their traditions the inclusive "Happy Holidays" rather than the specific "Merry Christmas" is in my view more loving, more generous and more in the spirit touted by those for whom "Merry Christmas" is an accurate indication of their belief system or at least their culture.

I'm willing to step away from the possibility that December may not be holiday time for some around here, and that even wishing someone "Happy Holidays" is making unwarranted lifestyle assumptions, since at least in North America there are public holidays exempting most from work, so I'll grant you that "Happy Holidays" is not exclusionary by this minimal standard, though I'll admit that there's a part of me that wonders if even this is valid.

I am stunned and outraged by the notion that a warmly inclusive wish translates into a "minority that is trying to take God away from us"; so completely at odds with my preferred world view and personal behaviour guidelines (I'm not perfect. I'm sure I've expressed things injudiciously more than once).

The assumption that the non-Christmas-celebrating minority is either godless or proselytisingly godless is ludicrous, not to mention offensive, and in my mind is analogous to the vitriolic homophobic ravings of terrified homosexuals in denial. 

Clearly this person is unaware of other faiths practised by Jews, Moslems, Hindus, Jains, Baha'is, Sikhs, Buddhists, and Wiccans, to name a few, none of which is godless, although the individual views of deities may differ from both each other as well as the Christian view. One thing I do know is that none of the adherents of the above-mentioned faiths have any desire to "take God away" from anyone else. In fact, I know of few non-extreme atheists who either want this, or are likely to do anything more heinous that which the earnest young men in white dress shirts who knock on your door at inconvenient times want to do, and which is regarded as a contractual obligation of their faith, obnoxious as it may be to others trying to get some sleep on the weekend.

I know I'm going to sound like a beauty pageant contestant, but how on earth will we ever achieve world peace if views like this are propagated?

Hatefulness is awfully disheartening.

Wednesday, January 14, 2009

In the Genes?

My daughter lucked into a show at a local art gallery - they had a last-minute cancellation and were desperate for a replacement, so they've waived all fees for her. She's madly making and mounting prints in the remaining four days before the show. She's even more of an optimist than I am, and the ultimate procrastinator, and never believes she won't get finished until deadlines are actually passed, so she's a lot calmer than I would be, were I in her position.

Tuesday, January 13, 2009

Over-Prepared, Under-Prepared

I'm always overly optimistic about what I can get done in a weekend, even when nothing unexpected happens.
I finished an entire necklace, as well as two partials for colours, packed kits and completed the instructions for one of my Bead Fest classes, so that's not too bad.
I started on the cushions.

I was supposed to be having some friends for dinner this evening, one of them being the friend for whom I'm supposed to make the cushions (he did me a huge favour. I owe him) and so I had my list for last night, which very clearly laid out all the advance food preparation for this evening, and left time for finishing two out of four cushions (those with flanges instead of that pesky piping).

Unfortunately someone needed help with instructions, and even though when I taught the class no one even struggled, I know it's not the same with written instructions, and so between my wordiness and the thought that perhaps a picture would help (actually, it's probably quite useful and should be included in the instructions), that hour and a half to be used for cushions was spoken for.

Still, I did manage to get most of the food do-aheads prepared: mushroom and turkey sausage lasagne (partially cooked), cream of cauliflower soup done (I think I shouldn't have used Hot curry powder though), tomatoes roasted. The dessert was to be in the oven (roasted pears with Greek-style yoghurt, honey and toasted nuts) as we ate, and salad whipped together after soup, so I was as prepared as I could have been.

Today at around 3:30pm I found out that I had the wrong week.

The lasagne (partially cooked) is in the freezer, and I had soup and roasted tomatoes over arugula for dinner.

But hey, there are always more beading patterns. Today's theme is netting.

These earrings are swingy and fairly quick to make, and don't use up too many beads (useful for gifts and left-over beads, respectively). I used Czech seeds, as I prefer them in netting, but I'm sure Japanese would work too. For something a bit more delicate you could also try size 15s, but with longer loops at the bottom (i.e. more beads).

I sell a kit with the earrings and cuff below bundled, but I'm happy to separate the patterns out.
Fading Colours Earrings Pattern:  $3 for PDF emailed to you


Materials
   Czech size 11 seed beads in 6 colours
   4mm fire-polished beads 
   Ear wires
   Size 10 needle
   Your favourite beading thread

The cuff fastens with cross-woven buttons, which also work well as earrings, and combine really well in shape with the pressed lentil shapes favoured for bracelets by many lampworkers.
I used six shades, and enjoyed playing with the fade factor. The netting itself is pretty simple, but you'll need to follow a chart for the colour placement. 

Fading Colours Cuff Pattern:  $7 for PDF emailed to you


Materials
  Czech size 11 seed beads in 6 colours
  4mm fire-polished beads
  Size 10 needle
  Your favourite beading thread

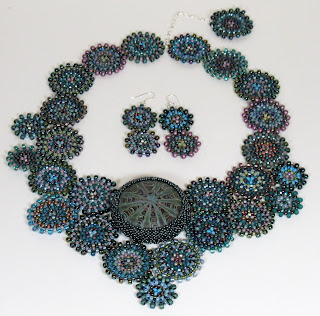
The earrings and cuff happened only because of the collar below.
I had taught a class in which we increased and decreased to make a collar the same shape, and I thought it might be fun to play with colour gradations as well.
Even though the picture of the flame-coloured collar looks better, the peacock colours actually look decent and flow nicely in real life, but the scanner just couldn't handle them too well.

The collar can be lengthened either by using a necklace extender style of clasp, or by adding more of the teeny triangles (the pictures show two on each side of the clasp). Of course it can also be shortened by opposite but analogous means (fewer of the teeny triangles).

Fading Colours Collar Pattern:  $15 for PDF emailed to you


Materials
   Czech size 11 seed beads in 6 colours
   4mm fire-polished beads
   Large teardrop bead or top-drilled pearl or briolette
   Clasp
   Size 1o needle
   Your favourite thread

I know some people only ever use white beading thread, but I think that's a mistake, as it aways shows (unless your beads are white too) and in my opinion looks cheesy. I always apply the same principle with beading threads as with sewing threads: aim for a match, slightly darker, which results in the thread looking rather like a shadow. 

For multi-colour beadwork, I either match the thread to the dominant colour if there is one, or one of the darker colours. If your beading tension is on the loose side, this should be of particular concern to you, as beading thread is generally functional rather than decorative, so you should choose a colour that will disappear into the background or shadows. Black, brown and grey are generally pretty safe choices, though I confess that I will choose other colours if I have them.

I've lost count of the number of these that I've made.
It was among the first classes I ever taught, and among the first kits I sold, and I generally sell one or two each time Amy has her sale.

It all started from another class in which I taught a tubular version of this netting variation. The store owner asked if the stitch could be worked flat, and so this was born. In the past year I've noticed a version of it on the web-site of a store that seems to have quite a few rather familiar designs supposedly created by their in-house designer. Whatever.

The instructions are written to use two buttons to fasten the cuff, but there's no reason why you can't use a tube clasp (you'll have to fiddle with the length to get it to fit snugly though) or weave a button like I did in the purplish one above, or make a beaded toggle clasp, or whatever. Snaps. Velcro. Magnets. The Power of the Mind. Or not.

It's pretty adaptable, and you can use fresh-water pearls with those tiny holes, since the bigger beads (all about 4mm, please) each have only one thread pass. I have seen people use Swarovski bicones, but personally I'd avoid them as they have sharp edges and the thread may curve as it exits the bead hole, rubbing against the sharp edges and eventually breaking. Using something like Fireline may delay breakage, but I'm convinced it's inevitable with sharp-edged crystals. 

I like to combine different shapes in different finishes in shades of the same colour. I inevitably use fresh-water pearls (potato; rice pearls would have a lacier look - I should try them sometime), fire-polished beads, cube seed beads, round beads, and occasionally size 5 triangle beads (these are the soft-edged triangles). Of course you could happily use all pearls or all fire-polished beads.

Once again, I generally choose Czech seed beads for this cuff, but I've seen it made up with Japanese beads, and it's still lovely.

Flat Russian-Style Netted Cuff Pattern: $6 for PDF mailed to you


Materials
  Czech size 11 seed beads
  4mm beads, 4 different shapes and/or colours
  2 5/8" shank buttons
  Size 10 needle
  Your favourite beading thread

Saturday, January 10, 2009

Want versus Should

I know I'm pretty self-indulgent when it comes to doing what I want to do, as opposed to what I should be doing, especially in the face of Really Not Very Good Class Enrollment at Bead Fest Santa Fe, but this time, I am working on class samples and instructions.
What I really want to be working with is this:
Seriously, do you blame me? Are those colours not gorgeous? I think the marquise stone is some sort of agate (most things seem to be agates or jaspers, with agates on the translucent side and jaspers less so. Usually. I think) and it's probably heat-treated to get those lovely warm shades of cranberry (a more grown-up shade than "pink"), but I love it anyway. And I have fabulous seed beads to use with it and a really fun idea which I'd rather be prototyping, but still, I'm working on class instructions.

I suppose it's also time to start working on supplies for both the classes as well as the Meet the Teachers reception, which I hope will make the trip out less of an expense, though I suppose if it ends up being just a vacation, how bad could that be? I'll get to spend time with Phreadde and Dan as well as some beading friends and hello, I'll be in Santa Fe, which even absent Bead Fest has more soaring creativity (both in terms of realization as well as inspiration) per square foot than most places, so I'm looking forward to the trip no matter what.

Meanwhile, more Shameless Commerce in the way of patterns.

A couple of years ago I had this idea for a series of related designs worked around basic geometric shapes. The plan was to combine a few flat shapes to form a three-dimensional pendant to be used as an earring, and then a three-dimensional open shape to be used as a donut for slider (as in on a necklace).
The triangle worked fabulously well, and you can fool around with colour patterning on each piece.
I love the look of the threader earrings, but they don't work as well as might be hoped if the holes in your ears are in any way stretched out, as mine are (from too many heavy dangle earrings, not those scary things which allow people to see clear through to the other side of your ear-lobe. Those make me a little queasy).

Perhaps the U-shaped threaders would be more stable. Any ear-wire would work, though I like the swinginess of having them on a chain.

When I make up kits, I include one if those silky necklace cords so that the slider can be worn Right Away, but I think many beaders would rather bead the perfect carrier themselves; the necklace cord is insurance against my being wrong. Or for it. How does that work?

Geometry Origami: Triangles Pattern:  $7.50 for PDF emailed to you


Materials
   Japanese size 11 seed beads (or Delicas) in 2 colours
   Ear wires or threaders
   Necklace for the slider
   Your favourite beading thread
   Size 10 needle

Then I played around with the rhombus, which we tend to think of as a diamond shape.
You can join three (or four, as shown here) to make a bicone-shaped pendant, which seemed to need ruffles around its middle, which inexplicably makes me think of the hippos in tutus from Fantasia.
Naturally the donut slider needed a tutu as well.

I like to use Czech seed beads for the ruffles as I think their rounder shape really lends itself well to beadwork in which the beads have to compete for space in a sort of organic and seemingly unstructured way, where the squarer, more regular Japanese seeds do better in a more structured format. Delicas would also work well here.

Geometry Origami: Diamonds Pattern: $9 for PDF emailed to you


Materials
Japanese size 11 seed beads (or delicas)
Czech size 11 seed beads
Ear wires
Necklace for the slider
Your favourite beading thread
Size 10 needle

None of the other shapes really yielded anything I liked quite as much, though I haven't completely given up.

One of the beading magazines a few years ago had a bangle pattern using cube seed beads. I thought it was a great idea and promptly made it up and hated it, mostly because it didn't hold its shape - and I'm a tight beader. By that I mean that I tend to bead using tight tension. 

The use of seed beads, while definitely necessary to create a curve, didn't produce the right curve either - and my tight tension, while doing nothing for the stiffness of the finished piece, also highlighted this bad curve.

A bangle just isn't a bangle if it's completely floppy, so I set out to make something more structurally sound.

What I ended up with is a pretty stiff bangle that uses Japanese cubes and Czech seed beads and an unusual thread path for tubular herringbone. It works up fairly quickly (each bangle isn't a multi-week vacation from family life) and even though my samples all use regular repeating colour patterns (and the instructions include charts for same), I've also made a very attractive bangle with oddments of leftover cube beads.
The holes on the cube beads are also big enough that if you have trouble maintaining tight tension, you can needle through the beadwork a few more times to stiffen it up.

I know it's winter right now here in the northern hemisphere, but I've always liked the look of an armful (read "more than one") of bangles on a summer wrist.

Bangalicious Pattern: $6 for PDF emailed to you


Materials
   4mm cube seed beads in 4 colours (or more. Or fewer)
   Size 11 Czech seed beads
   Your favourite beading thread
   Size 10 needle

Two notes about the beads: 
  1. Don't use Japanese seed beads. They're quite a bit bigger than Czech, and the curve of the bangle will be much tighter, so the bangle will end up smaller. If this is your desire, go ahead and experiment, but it may end up too small for an adult.
  2. Cull your cubes ruthlessly. Even though Japanese seed beads in general tend to be pretty regular, the cubes tend not to be. Throw away beads that vary in size from the average, and that have sloped or sharp edges. There seems to be a fair amount of breakage quite often, and those sharp edges will cut your thread, apart from the fact that a broken bead is smaller than it should be.

Wednesday, January 7, 2009

By Special Request

I don't know if it's a self-selecting group, but every time I teach this class, it seems that the participants really get a kick out of it. The circles and colour-play are quite addictive!
The instructions show you how to make flat peyote circles using mostly size 8 seeds (use size 6 around the edges), and then join them together to make a few bracelets or a choker-length necklace. You also get to make a matching button for a seamless closure.
This project is excellent for developing both an awareness of your thread tension (too tight and the circles won't lie quite flat; too loose and they'll look gappy), and in my opinion it's a great selling point for Czech seed beads, which so many people disregard as uneven - but in this instance they're ideal, as you can select the appropriate bead size for the task: small beads are good for the increase points, while bigger beads are better for the round just before the increase round.
It's a versatile technique, as you can see from the necklaces above and below, and you can't use too many colours (I'd recommend at least five or six but go up to forty or more).
Once again, it's ideal for people who tend to bead in short bursts of time, as each circle doesn't take long to make.

Circles Pattern:  $9.50 for PDF file which I will email to you


Materials
  Czech and/or Japanese size 8 seed beads in a variety of colours
  Size 6 seed beads
  Your favourite beading thread
  Size 10 needle

But wait, there's more!

I enjoy projects like this one, because it's repetitive without being boring.
You do stretches of relaxing herringbone interspersed with bunches of berries where you have to pay attention: the little drop beads would much rather fall to the inside of the rope, and require encouragement to remain on the outside.

Then when you're thoroughly annoyed at the recalcitrance of those drops, you're back to herringbone again. You also get to look forward to making a herringbone loop and toggle clasp to match.

Berries Necklace Pattern:  $10 for PDF file which will be mailed to you


Materials
   Size 11 Japanese seed beads in 2 colours
   Japanese fringe beads to match the 2nd colour
   Your favourite beading thread
   Size 10 needle

And OMG! Still more!

You do have to excuse the picture, as it's pre-camera, when all I had was a scanner.
I thought I was being very clever when I named this Eye of the Tiger: I was using tigereye (gold for the first necklace, red for the close-up) cabochons and beads, and the little increase motifs in the herringbone chain sort of have the shape of eyes, so I couldn't resist. I like bad, unoriginal puns, what can I say.

Of course, you don't have to use tigereye, and if you're willing to fiddle with bead counts, you can use a cab that is not 18x25mm. 

I guess I feel this way about most of the projects that I make and write up, but I enjoyed this one. You fiddle about with the focal, bezelling it, then embellishing, and then the chain is just a walk in the park with a bit of interest to keep you awake.

Eye of the Tiger Necklace Pattern: $12 for PDF file emailed to you


Materials
  Japanese size 11 seed beads in 2 colours
  Japanese size 14 seed beads
  Czech charlottes (size 13) 
  18x25mm cabochon
  4mm round or faceted beads
  1 size 8 seed bead (really)
  Purchased clasp
  Your favourite beading thread
  Size 10 or 12 needle

In case you're wondering, I price my patterns according to their length and complexity, so a higher priced pattern is going to be a longer pattern, probably with more steps. Unless I'm aiming a pattern at beginners, and illustrating pretty much every poke of the needle, the length of the pattern does correlate pretty well with the complexity of the design: I try to give very detailed instructions for anything that is non-standard or a not very intuitive technique.

Most of my patterns are very wordy (I like to explain in precise detail), and each step is illustrated with photographs of the beadwork (occasionally held in my fingers if necessary to show a particular detail). Occasionally I use graphs, generally for colour charts.

I try to photograph pieces in such a way so as to highlight the visible changes from one step to the next, if necessary keeping the orientation of the work in progress the same from one picture to the next, so as to show the progress more clearly. 

I try to make my instructions non-handed, even though I'm a righty, as I figure you can always flip it over (if it's flat) to check your progress - and in truth, when you're working in rows back and forth on a flat piece, you may well flip it over for each row. Sometimes I flip, and sometimes I just stitch back and forth without really moving the beadwork around in my "holding" hand. 

If you have difficulty with my instructions, PLEASE LET ME KNOW so that I can help. The way I look at it is that unless you're a rank beginner attempting something very involved, I haven't explained it clearly enough if you can't figure out what I mean, and it's MY FAILING.